If you prefer to watch a video, please watch below:
To enable the Invoice Caps feature please reach out to your Customer Success Manager so they can enable it for your organisation.
Once enabled, please follow the steps I've included below to configure Invoice Caps for your organization.
- Go to MySettings
- Go to Payments
- Click on the INVOICES tab
- Enable Invoice caps by using the toggle below.

- You’ll then be asked to choose ‘How should Invoice Caps be enforced?’. There are 3 options:
- By Billing Cycle will align the Cap to your current invoicing cycle (Weekly, Bi-weekly, Monthly)
- By Calendar Week will enforce the Cap every week - if you choose this option you will be asked to select which day of the week you would like the invoice caps to reset.
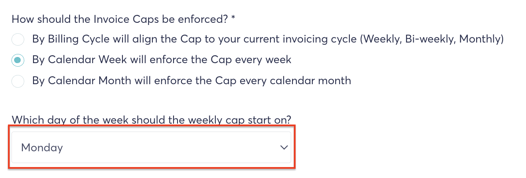
- By Calendar Month will enforce the Cap every calendar month
Please then use the toggles to configure the remaining settings.
6. You have the option to “Auto-approve Worksheets and Proforma Invoices that are within a user's Invoice Cap” - By activating this option any Worksheet or Proforma Invoice that a user submits within their Invoice Cap for the current Billing Period will be automatically approved. If needed, an approved Worksheet or Proforma Invoice may be voided by a Manager before it is invoiced.
7. You have the option to “Only auto-approve Worksheets that are created via the Time Tracker” - By default, all Worksheets and Proforma invoices that are created within the current Invoice Cap will be auto-approved. By activating this option, only Worksheets that are created via Time Tracker will be auto-approved. Any Worksheets or Proforma invoices that are manually submitted will require manual approval.
8. Finally, you have the option to “Allow users to submit Worksheets and Proforma invoices that exceed their Cap” - By activating this option any Worksheets or Proforma Invoices that a user submits that are within their Invoice Cap will be automatically approved. Those that exceed the Cap will require manual approval by a Manager.

Once your settings are configured you’re then ready to set the invoice caps for your individual providers. To do this:
- Go to Teams > Providers
- Locate the provider profile you would like to set an invoice cap for and click on their profile
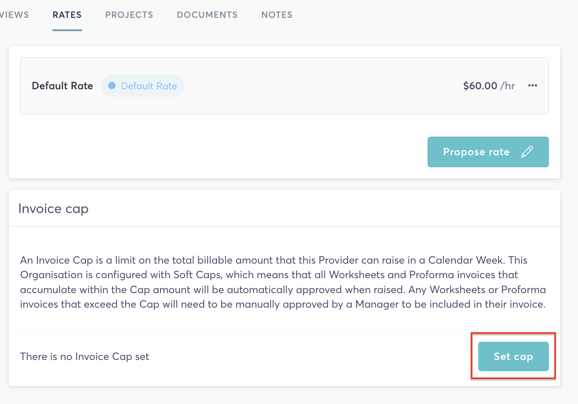
- Go to the ‘RATES’ section.
- Under the Invoice cap section click on ’Set cap’
5. You then have 2 options:
- “A maximum invoice amount in the Organization's currency” allows you to set a maximum figure amount the provider can submit within your set billing period.
- “A limit on their default rate” allows you to set a cap based on the provider's default rate unit. For example, if the Provider's default rate is $50 per hour, you can set a limit of hours that they can invoice for during the Cap Period. We then convert this to a total value. So if you enter 60 hours, the Invoice Cap will be set to $50 x 60 = $3,000.
IMPORTANT: If you change the Provider's default rate, the invoice Cap amount remains static. You will have to review and change their Invoice Cap should you still want to have a 60-hour limit. For example, if you change the Provider's rate to $100 per hour, the Cap limit will remain at $3,000, and the equivalent hours will be 30.
6. Once you’ve set the cap please click ‘Save’. The invoice cap will now be active for that provider.
For any additional queries or guidance please contact support@talentdesk.io.