
Organization
The Organization setting stores information related to your organization's TalentDesk account configuration, i.e. account default currency, payment cycle, default rate unit, etc. If you would ever like to make changes to these items, please reach out to your Customer Success Manager.
You can update details relating to your company logo, company name, company address, registration number, and website at any time. If changes are made, click the 'Update' button at the bottom of the page.

General Settings
Configure team visibility settings, Global Messaging, Provider reviews, and provider availability across your talent network.

Payments
Review settings as they relate to service orders (worksheets, expenses, proforma invoices) and cutoff date visibility. Customize settings for Invoice Caps, enable payment method options for your providers, and configure your Time Tracker if applicable.

Projects & Tasks
Customize Project and Task settings.


Financial Controller
Financial Controllers have access to all service orders, invoices, and reports in the company's account. To assign a Manager to a Financial Controller role, click the 'Add Financial controller' button in the top right corner of the page. Search, filter, and select the manager(s) you would like to assign to this unique role.
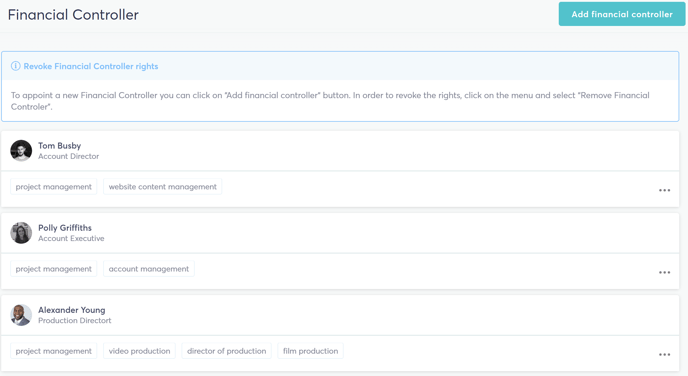
You can remove a Manager as a Financial Controller at any time by clicking on the three dots next to their name and selecting, 'Remove manager'.

Privacy
Configure your account's project privacy settings.

Custom Skills
Create custom skills and skill directories for your Organization that your Providers can tag to their profiles or your managers can tag to projects and tasks. The first tab is for Custom Skills where you can add new organization skills by clicking on the 'Create Skill' button.

Type in the name of the skill you want to add and pull it in from TalentDesk's skills database, or create an entirely new, custom skill for your organization.

To create a custom skill directory for your organization, click the Create skill directory button.
 From here, name your directory and add as many skills as you would like!
Onboarding Forms
Create custom onboarding forms for your Providers to complete when they sign up to join your company on TalentDesk. Capture critical and mandatory information from contractors before they are approved to start working for you through the platform. You can create as many unique onboarding forms as you would like.
In the Onboarding Forms settings, decide whether you want to give managers access to creating and editing onboarding forms, to make onboarding forms mandatory so no one slips under the radar, or enable the ability to auto-approve invitees to fast track them through your onboarding process.

If you want to create a unique hyperlink to embed on your company's website, select the three dots next to the onboarding form that you want to use and select, 'Invite Link', from the dropdown menu.

From here, select 'Generate invite link'.

The system will create a unique hyperlink that you can copy and embed on your company website or recruitment sites for contractors to apply to work for you and join your TalentDesk network.

Imports
If you would like to perform a bulk Import you can do so in this section. Currently, a company can import Worksheets, Skills, Team (providers and manager), Project & Task Assignments, Projects, and Tasks.

To learn more about bulk importing on TalentDesk, please refer to Importing data via CSV.
Roles & Permissions
Roles & Permissions let a company customize the access levels of different managers in their network. You will notice that Organization Owner, Financial Controller, and Project Manager are default roles in TalentDesk. To create new role with a unique set of permissions, click on the blue 'Create Role' button in the top right corner of the page.

Assign the custom role a name and then start toggling on/off different permissions for the different areas of the platform (Team, Projects & Tasks, Reports, Finances, Settings, Legal & Taxes, etc) and select, 'Create role'.

Next, assign Managers to your custom role by toggling to the Members tab and searching for the Managers you want to add from your network. Only Managers who have accepted their invitation to TalentDesk will be available to add to your new role.

To remove a member from a role, locate the member within the role and select the dropdown arrow next to their name. Select 'Remove member'.

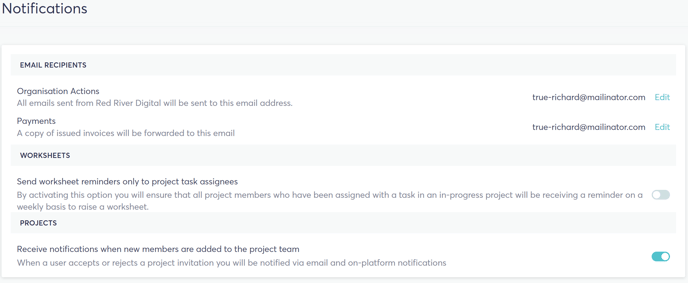
Notifications
Review and edit email recipients and actions across your account.
Templates
Refer to our Creating and Updating Templates guide to learn how to utilize templates in TalentDesk.
Integrations & API
With our soon-to-be open API you'll be able to integrate the apps you’re already using. We already offer accounting integrations like Xero - so if you're interested in enabling these please speak to your account manager. To find out more on the different apps you can integrate, please have a look at our list here.
Tax
Refer to our 1099 Filing Guide to learn more about obtaining contractor tax information through TalentDesk.
Email Templates
Refer to our tutorial on Email Templates to learn more about customizing notifications that are distributed from TalentDesk to your users.