
Guide for Managers
Contents:
- Introduction to TalentDesk
- Inviting freelancers
- Accessing your freelancer database & viewing profiles
- Creating projects
- How to create a project
- Inviting team members to a project and starting it
- Creating and managing tasks
- How to create a task
- Assigning and managing task
- Completing tasks and approving worksheets
- All you need to know about budgets
- Support
1. Introduction to TalentDesk
TalentDesk is an end-to-end workforce platform for clients and freelancers to collaborate on projects across the world.
Visit https://talentdesk.io/login to log in and start using the platform.
Step 1: Setup your profile and add a picture of yourself by clicking here!

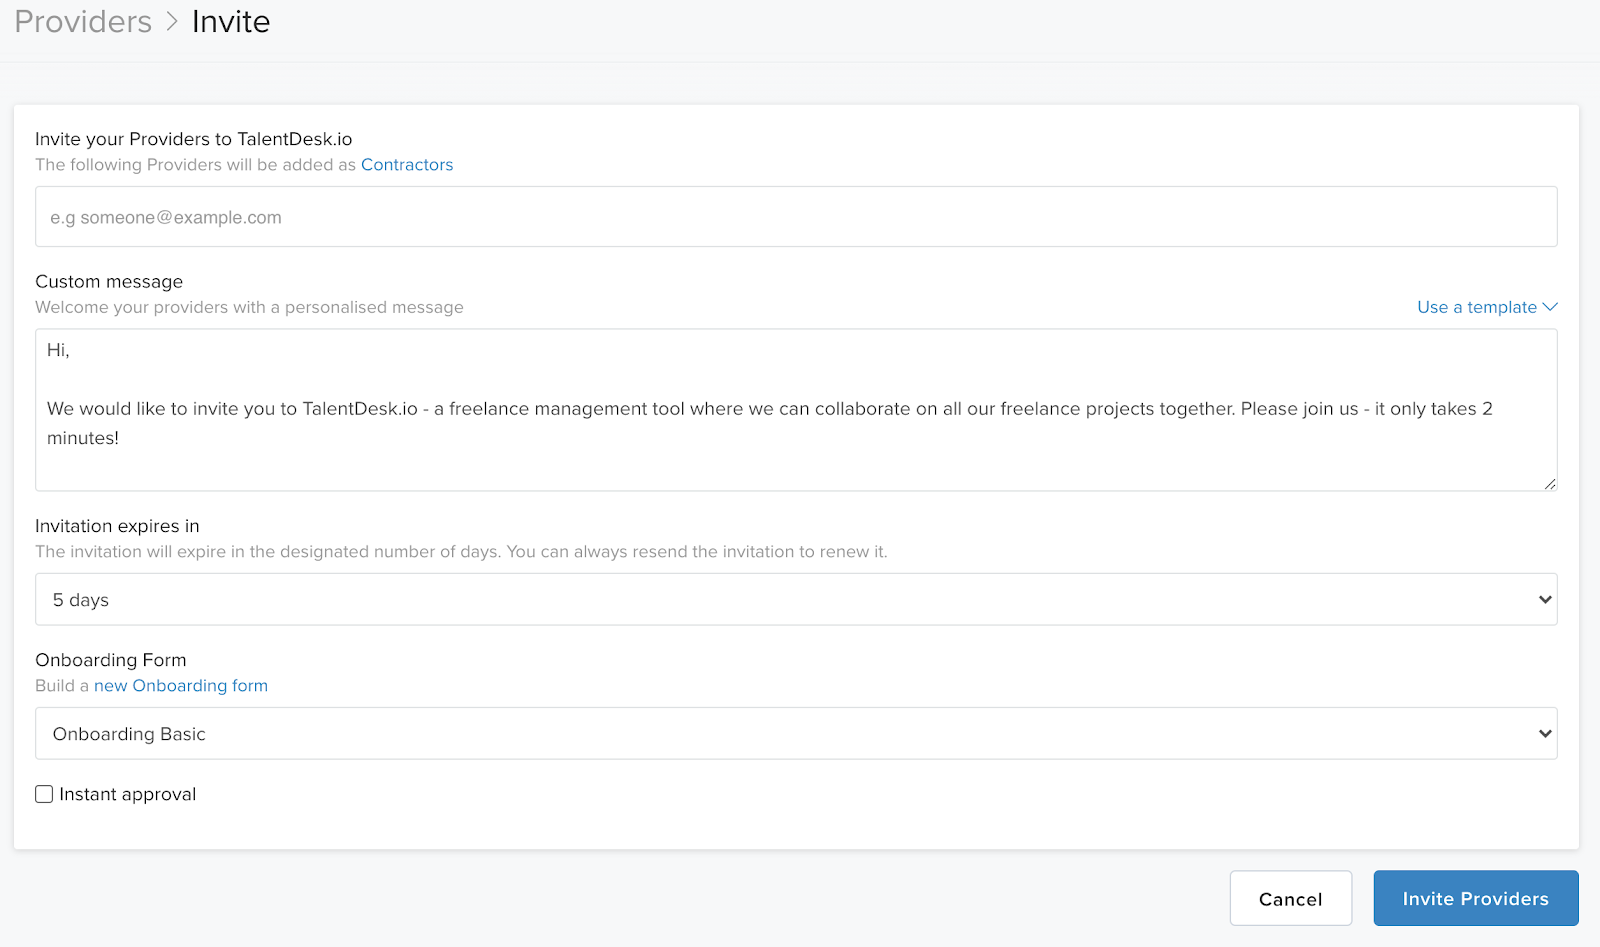
2. Inviting freelancers
(Back to contents 🔝)
How to invite freelancers
Freelancers can be invited onto TalentDesk by heading to the ‘Team’ section on your left panel, choosing the ‘Providers’ subsection and then selecting ‘Invite providers’. After adding the relevant email addresses in the first box, be sure to include a custom message outlining why you’d like the freelancers to join TalentDesk (you might want to outline that you’ll be using TalentDesk to manage and pay your freelancers).
Finally please ensure you include the relevant onboarding form.
3. Accessing your freelancer database & viewing profiles
Finding specific individuals
Navigating to the ’Provider’ subsection within ‘Teams’ gives you an overview of your entire freelance and contractor database. Be sure to filter and search according to specific criteria such as availability, language and skills in order to find the most suitable individual.
Viewing the freelancer profiles
Once you’ve zeroed in on the provider you’d like to work with, you’re taken to the ‘About’ section of their profile where you can see key information such as their availability (which is updated by them), skills and contractual information. Also within their profile, you can see reviews left by managers (visible to the freelancers), notes (not visible to the freelancers), their various rates and the projects they’re involved in.

You also have the ability to confirm whether they have added their payment details under their profile.
Finding freelancer onboarding forms
When freelancers join TalentDesk, they are required to submit an onboarding form which typically covers various types of background information. To find the onboarding form of a specific freelancer, simply locate their profile in the ‘Providers’ section within ‘Teams’ and select the ‘...’ to the far right of their name. Clicking on ‘View onboarding submission’ will pull up the form they filled.

4. Creating projects
How to create a project
To create projects, simply head to the ‘Projects’ tab on the left and select ‘Create new project’ on the top right hand side of the page. Please make sure to fill out all the required fields.

When titling your project, remember to add specific keywords that will help you locate that project easily in the future. Once you have created a project, please follow these steps:
-
Invite managers to the project
-
Add a budget for the project
-
Click on ‘Start Project’
Please note that you can always add additional budget to the project after it has started (see budget section below for more).
Inviting team members to a project and starting it
Once you have created the base for your project, go into the ‘team’ section. To add managers you need to select the small down arrow to the right, and invite anyone else from your team.

Once you have added the team to the project, please start the Project. You can do this by simply going back to the main project page and selecting ‘Start project’ on the top right.

5. Creating and managing tasks
How to create a task
Tasks are created within a project and therefore require a project to have been created in the first place. Once this is done, within the task subsection of the relevant project select ‘Create task’ after which you’ll be required to provide key information such as Task Title and Description.

Assigning and managing tasks
Once you have created a task, please assign it to a freelancer with a specific rate by clicking on “Add Providers”. The freelancers will then have to accept work on that task at that rate.
Having created and assigned tasks, there is various functionality within tasks at your disposal. They are as follows:
-
Progress tracking: track the progress of specific freelancers via the progress tracker at the bottom right within the task overview
-
Checklist: Set and track milestones
-
Discussion board: Discuss collaboratively with the entire team involved in this task via the group chat within the discussion subsection. Alternatively, you can directly message the relevant freelancer by selecting their name from the left panel within the discussion board
-
Deliverables: Exchange deliverables with freelancers within the deliverables tab
Completing tasks and approving worksheets
Once a task has been completed, please click on the “Complete Task” button which will prompt you to raise a worksheet for your freelancer(s). For best practise, If you would like to raise worksheets for individual freelancers at different times, it's best to create a separate task for each. Here is a video explaining how this works.

If you’d like to learn more about how a freelancer would use TalentDesk.io, please read this article.
Important: Please note that all worksheets must be created and approved by the following dates in order for invoices to be generated on the next working day:
-
7th of the month
-
14th of the month
-
22nd of the month
-
Last working day of the month
6. All you need to know about budgets
As a manager, you can keep track of your budgets under the ’Finance’ section of your account.
-
Go to Finances / Manage budgets
Here, you will be able to view everything from current budgets to your allocation history.

When adding budgets to projects, it is important to remember that worksheets can only be raised for amounts that are within the budget of a project. If there is not enough budget available, you will need to add more.
How to add budget to a project
-
Budgets can be added when you are first creating a project under ‘Advanced options’.
-
Some additional budget can be added to an existing project by going into ‘Purchase Orders’ and selecting ‘Request budget’.

Requesting budget
When you are requesting additional budget, please add the amount you need into the request box and then click on ‘Find manager’. Only managers who have enough budget in their account will appear as an option. If you see your own name come up, we would recommend you select that — otherwise, please select your team’s manager or the organisation owner.

Leftover budget in a project post-completion
If your project is complete and you still have budget left over, you can return the remaining funds back into your budget pot.
Once you close a project by selecting the ‘Complete project’ option, the wording on the button will change to ‘All done’. You will notice a drop down arrow next to this — click on this arrow to find the option to ‘Return funds’.

Selecting a manager as a payments reviewer
If your organisation has "Second level of financial approval" enabled in Settings, then when viewing a project there is a "Payments reviewer" section. This will default to the organisation's financial controller or creator. By clicking on their name, a confirmation modal will prompt you to select one of the project’s managers as a Payments Reviewer.
This selected manager will then be able to approve worksheets and expenses for this particular project. Please note you will not be able to remove this selected Reviewer from the project. You can only remove this person from the project by first appointing another manager as Payments Reviewer.

7. Support
Please reach out to support@talentdesk.io or message us on the live chat if you have any questions about the platform.

Stefani Thrasyvoulou
Stefani Thrasyvoulou has made her mark in the freelancer industry with four transformative years with TalentDesk, playing a pivotal role in the company’s 2x growth.
Speak to us to find out how we can help you pay your contractors more efficiently
Related articles

AI and Compliance: What Companies Need to Know When Using AI to Manage Contractors
Using AI in contractor management comes with real compliance risks. Discover how to stay on the right side of IR35, the EU AI Act, and classification laws.

Freelancer & Contractor Glossary: Every Term You Need to Know
The complete glossary of freelancer and contractor terminology - from work arrangements and tax classifications to compliance and vendor management.

C2C vs 1099 workers: What's the Difference and Which Should You Engage?
Learn the key differences between 1099 and C2C workers, including tax implications, liability, and how to choose the right contractor for your needs.

What is Workforce Management?
Workforce management goes far beyond time tracking. Discover key benefits, tools you need to optimize distributed teams, reduce costs, & stay compliant.

The Best Workforce Management Software in 2026
The best workforce management software in 2026 - reviewed by use case, team size, and workforce type. Find the right platform for your organization.

Best Ways to Manage an External Workforce
Learn how to manage your external workforce efficiently in 2026. Discover best practices for classification, compliance, visibility, and engagement.

How to Train Managers to Support Mental Health in Remote & Hybrid Teams?
Learn how to train managers to support mental health in remote & hybrid teams. Spot early warning signs and handle sensitive conversations with our guide.

2025 Engineering Recap
A recap of TalentDesk’s 2025 milestones, including vendor management, dynamic contracts, insights, global payments, and customer-driven improvements.

Vendor Performance Management: Essential KPIs & Strategies for Procurement Teams
Strengthen your procurement strategy with effective vendor performance management. Learn the essential KPIs, best practices and automation benefits.

Vendor Selection Best Practices: How to Choose the Right Supplier
Learn how to choose the right talent vendor. This guide covers best practices for vendor selection, from pricing and capacity to ensuring compliance.